在上次提到了設定 TortoiseSVN 的時候,有個地方是包含路徑。

如果在上次還沒有建立一個樣式專用的資料夾的話,那必須建立一個專用的資料夾,才能接續之後的設定。
建立專用資料夾的另一個好處是可以把所有作品都放在一起,比較好找。
以上例的 pixnettest 資料夾為例,在它上面按右鍵,選擇 TortoiseSVN 子選單,裡頭有一個取出(K)。

按下取出之後會有如下的畫面。

在檔案庫URL的部份就是在 OpenSVN 建立的專案網址。
如果設定是只能以 https:// 連線的話網址開頭就得換成 https:// ,不然 http:// 或 https:// 均可。
如果設定成不能 Anonymous 匿名拜訪的話還得輸入帳號密碼。
為了講解方便,我把 OpenSVN 設定成必須以 https:// 連線並輸入帳號密碼的狀態。
版本選最新版本即可,反正專案到現在都還是維持在 revision 0 的狀態。
其他不用設定。好了之後按確定。
如果在網址列設定為 https:// 時會出現如下的視窗。

按永久接受。
如果設定為須帳號密碼才能拜訪還會有這個視窗。

輸入用戶名稱和密碼,選擇儲存認證。
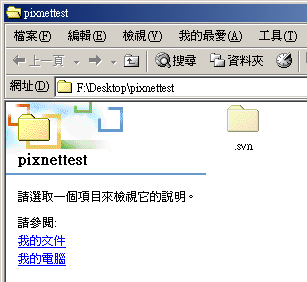
都好了它就會開始執行取出,理論上很快就會跳到如下的畫面,代表取出完成。

取出完成以後會在樣式資料夾裡多出一個 .svn 的設定資料夾,預設為隱藏,不用理它。
回到樣式目錄的上一層,重新在目錄上按右鍵,會發現選單變多了,這樣就代表這個資料夾設定完成了。

(待續)
如果在上次還沒有建立一個樣式專用的資料夾的話,那必須建立一個專用的資料夾,才能接續之後的設定。
建立專用資料夾的另一個好處是可以把所有作品都放在一起,比較好找。
以上例的 pixnettest 資料夾為例,在它上面按右鍵,選擇 TortoiseSVN 子選單,裡頭有一個取出(K)。
按下取出之後會有如下的畫面。
在檔案庫URL的部份就是在 OpenSVN 建立的專案網址。
如果設定是只能以 https:// 連線的話網址開頭就得換成 https:// ,不然 http:// 或 https:// 均可。
如果設定成不能 Anonymous 匿名拜訪的話還得輸入帳號密碼。
為了講解方便,我把 OpenSVN 設定成必須以 https:// 連線並輸入帳號密碼的狀態。
版本選最新版本即可,反正專案到現在都還是維持在 revision 0 的狀態。
其他不用設定。好了之後按確定。
如果在網址列設定為 https:// 時會出現如下的視窗。
按永久接受。
如果設定為須帳號密碼才能拜訪還會有這個視窗。
輸入用戶名稱和密碼,選擇儲存認證。
都好了它就會開始執行取出,理論上很快就會跳到如下的畫面,代表取出完成。
取出完成以後會在樣式資料夾裡多出一個 .svn 的設定資料夾,預設為隱藏,不用理它。
回到樣式目錄的上一層,重新在目錄上按右鍵,會發現選單變多了,這樣就代表這個資料夾設定完成了。
(待續)
請先 登入 以發表留言。